#52weekProject: Week 5 – Freelensing Chicago

Week 5: Freelensing Chicago

The Chicago Theater

Decided to try a little bit of free-lensing for this week right around the corner from work. Taken Monday, March 3rd, 2014.

What is free-lensing, you ask? (No, you didn’t. But I’ll tell you anyway.) Free-lensing is when you take your lens off of the body and hand hold it, so you can tilt and shift the lens to create a different plane of focus (basically a poor man’s tilt-shift lens).

I used a 50mm lens from my medium format Bronica ETRSi setup, which allows me a little more room to tilt and shift the lens without drastic vignetting, but you do end up with a softer image and some light leaks. Not sure I really dig it the final image, but you know, it’s all about trying something new!

#52weekproject: Week 4 – Getting Flashed in the Park

Jared and Hagene

Jared and Hagene

GTFO! Going To Flipping Oregon!

Sometimes, you find yourself so irritated with your friends, that the only way to get away from them is to move just about as far away as possible. And that’s just what my friends, Jared and Hagene did. Sure, they claim it was because Hage landed this really awesome job opportunity with Nike, but one can never really be sure, you know?

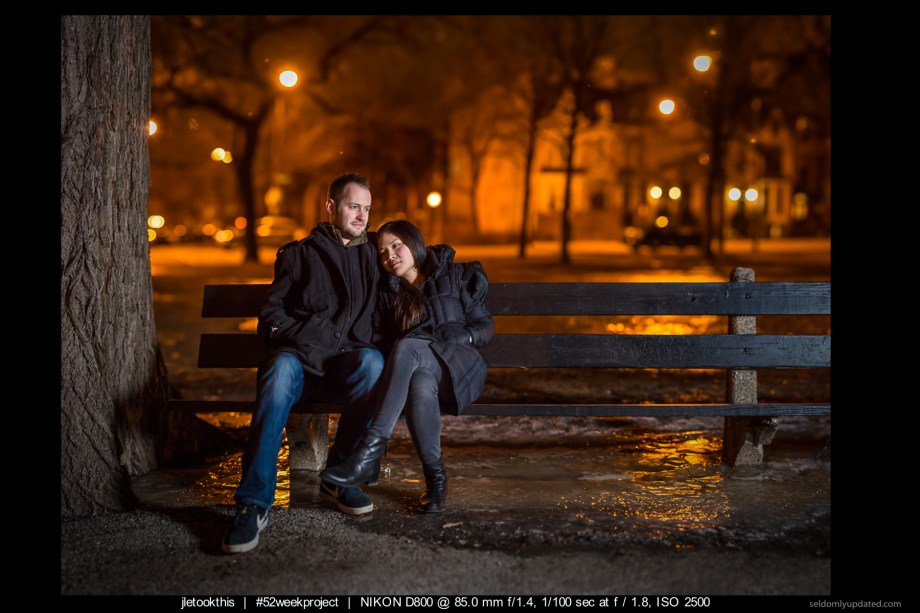
Last Monday was their last night in town. They gathered some of their closest friends in Chicago (which I assume includes me, since I was there) for a low-key farewell dinner at Bricks Pizza. We enjoyed some laughs over drinks, and thin-crust pizza, and ended with some hugs, tears, and farewells. It was definitely a bittersweet farewell, as Hage has been one of my best friends for over 13 years. We’ve been friends since our time in the dorms at the University of Michigan, and she was kind enough to tolerate me and let me crash on her couch when she convinced me to take a job in Chicago a couple years ago. So, to me, I’m not really saying “farewell”, I’m just saying, “Hey, can’t wait to crash on your couch in Portland!”

Just around the corner from the restaurant was a park bench, which was basically the first thing I saw that would be suitable for them to sit on. Temps were hovering in the single digits, so I tried to make it this portrait session as quick as possible. I did my best Chris Hansen impression and asked:

“Why don’t you take a seat over there?”

They did as I asked, and got comfy as I set up my equipment. I set up my flash and lightstand with a white shoot through umbrella just to the right, and started moving quickly. I had everything set up manually; triggering the flash with some cheapo (but super reliable, yongnuo rf-602) flash triggers. So yeah, I was the flasher in the park.

The Brenizer Method

So, sure, this looks like a pretty straightforward portrait, shot strobist style. But, that’s the genius behind the whole thing. It’s not an ordinary portrait. It’s shot using a unique technique which replicates the look of large format by allowing more shallow depth of field than is capable with a full-frame camera. How is this done you ask? By taking a series of overlapping photos that can be stitched together and expanding that photo into a larger panorama. This technique is known as a bokeh panorama, or expansion, but more commonly referred to as the Brenizer Method. It’s pretty awesome.

So, I’ve known about this technique for a while, but never really put it into practice. I’ve always had trouble with getting panoramas to line up and stitch together properly, but I think that’s likely because I’m using too wide of a lens. Here, I’m using a 85mm, so I can get more shallow depth of field, but it also means there’s less distortion in the photo, which makes it easier to stitch together. I did still have to do a little filling in since I missed the bottom right corner, but I think it turned out pretty well for my first attempt.

Shot with my D800, and a total of 21 shots. I downsized each photo to a 12mp jpeg before I stitched them together (otherwise, it would have been way too big for my computer to handle). I still ended up with a 60 megapixel photo (or what would have been 180 megapixels if I hadn’t resized). And, the extra bonus is that with the larger image, the noise is reduced (or at least smaller when resized), so the image looks extra smooth.

So, yeah. Super happy with the results from this week’s project. Anybody else try this technique before?

#52WeekProject: 2/52

Week 2 of my 52 week project:
So my friends, Samer and Sameer, had asked me to come over and take some photos of an end table they have for their startup, Unbranded Designs, but while I was shooting, Virgil decided to join in on the fun. I shot this using a couple of off camera flashes, with a shoot through umbrella on the left, and a reflective umbrella on the right. I used a black muslin as a backdrop, but ended up doing a little photoshopping to bring the contrast out in the photo.

Virgil, 2014

Virgil, Photo taken Wednesday, February 12th, 2014

Here’s the picture of the actual end table though as a bonus:
JLE_1171 l

#52weekproject: Week 1 – Madison & Wabash

In an effort to go out and take (better) photos, I’ve decided to engage in a 52 week project. Each week, I will put some effort toward taking a quality photo, and will attempt to post one photo every week. It might seem like I started a month late, but really, I procrastinated until the Vietnamese New Year to get started.

No set subjects or themes, just whatever I happen to put some thought towards each week. So, if you have suggestions/topics/locations/ideas, I’d love to hear them.

Chicago, 2014

Chicago, 2014

Madison/Wabash station in downtown Chicago on the way home from work, Thursday, Feb 6th, 2014.

Photo actually turned out better than expected, so, I may have set the bar a little high the first week.

Big Sur Timelapse

So after Christmas with my family in San Jose, California, I rented a car, and drove down the coast to spend time with my friends in Los Angeles for New Years. My plan was to camp for a night in Big Sur, and do some timelapse photos, but with everyone being on vacation and the weather being super nice, all of the campsites ended up being booked before I got there.

I didn’t get to spend much time in Big Sur, since the sun was starting to set by the time I got there, so I just found an area I could pull over, and hike around a bit. I set up my camera and started shooting, but after the sun set, the air cooled, and the fog and moisture seemed to literally, come out of thin air. So, in my mind, I thought I wasn’t going to get really great photos of the sky since it was starting to get foggy, so I ended up skedaddling after about an hour and a half to find a hotel.

Anyway, after checking my photos, it turns out I didn’t end up with enough shots to make a real long timelapse, but I decided to put it together anyway and make it more like a fast moving slideshow.

But I guess it’s a learning experience. Just another reason for me to return to the West Coast sometime, and plan on spending more time out there!

That’s it for now!

P.s. Be sure to watch it in HD for full effect.